In this video post, little Cami and I prepare a nest box for our French angora doe, Dandelion. If she is pregnant, she will deliver her babies within the next five to ten days.
Monday, February 20, 2012
Nest Box for Dandelion
In this video post, little Cami and I prepare a nest box for our French angora doe, Dandelion. If she is pregnant, she will deliver her babies within the next five to ten days.
Sunday, February 19, 2012
DIY Rabbit Cage Rack :: tutorial
Now, what do you do with a cage and a pan with no apparent method of putting them together? You could buy a stacking leg kit with a pan holder for $25 each. Or you could get crazy with some PVC pipe. I chose the latter.

These two racks are each capable of holding three cages and dropping pans giving me space for six cages now!
Here is how you can make your own:
**The following measurements are for "Pet Lodge" brand 30"x36" wire rabbit cages and the corresponding dropping pan. I have in no way been paid or otherwise compensated for using or writing about this brand... but that would be great wouldn't it?**

First collect your supplies:
You may need to cut the PVC to the appropriate lengths listed. All PVC pipe used in this project is 3/4 inch size. This tutorial is to build ONE rack that holds THREE cages. In the pictures I built two of these.
(Number Needed) Description --Part Label
(2) 20 3/4" PVC lengths --stableizers
(4) 11" PVC lengths --tops
(8) 21" PVC lengths --verticals
(6) 37" PVC lengths --horizontals
(4) 6" PVC lengths --legs
(12) 'T' PVC connectors
(4) Elbow PVC connectors
(6) 24" lengths of aluminum or steel 'L' angled metal; preferably with pre-drilled holes
(12) 1/4" threaded bolts, 2" long
(12) metal washers
(12) locking nuts for threaded bolts
(2 oz.) PVC pipe glue/cement

Assemble and glue (4) lengths: 21" vertical, 'T' connector, 6" leg.

Add to the top of that and glue in place: 'T' connector, 21" vertical. Be sure all of your 'T' connectors are facing the exact same direction and lined up.
(Not pictured): add to top of each pole a 'T' connector and 11" tops. Glue in place.

First measure that your 37" horizontals leave at least 36 1/4" between 21" verticals. This measurement may include the 'T' connector. Mark a line where the 'T' and the PVC meet so when you glue the horizontals into place, you are leaving enough space for the cage to fit in.
Glue 37" horizontals across and into both sides at the 'T' connectors. Repeat for second set. (Not pictured): don't forget that third set of 'T' connectors and 11" tops connected to the top from the last step. You should have (3) horizontals glued in place now for each set of legs.

Measure 3" from the bottom of each 'T' connector and mark a visible line. This should be a little more than the height of your dropping pan. Hold the metal angle so that the corner of the 'L' shape is just above your line. Mark a dot through one of the holes in your metal angle so that it is in the exact inside of the PVC pipe. Drill a hole all of the way through with a 5/16 drill bit. This is one bit bigger than your 1/4" bolts and they should pass through fine.

If you bought a long length of metal angle and then cut it into pieces you may end up with a cut hole at one of your ends like this. It's okay, truck on. Just use the next closest complete hole. Attach the metal angle from one set of legs to the other using a bolt, washer, and locking nut on each side of the metal angle. These metal angles will be holding your dropping pan allowing it to slide out for easy cleaning.

Repeat connecting the metal angle from one set of legs to the other set using bolt, washer, nut for the remaining (5) metal angles. The rack should look like this so far. A total of (6) metal angles connecting the two sets of legs from under the 'T' connectors.
Your sequence of parts should go like this from top to bottom: 11" tops, 'T' connector to 37" horizontal, metal angle attached to 21" vertical, 'T' connector to 37" horizontal, metal angle attached to 21" vertical, 'T' connector to 37" horizontal, metal angle attached to 6" leg.

Last, but not least, glue PVC elbows onto the top pieces facing each other as pictured. Glue one side of the 20 3/4" stabilizer piece into each PVC elbow parallel to the metal angles.

Two finished racks side by side. Now just insert cages, dropping pans, and... Rabbits!

Friday, February 17, 2012
Honesty in Building
I always try my best to be as honest as possible when sharing our projects around the farm with you. Especially when it comes to how much something will cost. Mostly because that's what I like to know first before I start a project.
This is all leading to the fact that we just got back from Orchard Supply Hardware store with the materials to (finally) build the stacking rack for the rabbit cages. We picked up enough materials to build two racks that hold three cages giving us enough room to comfortably house six rabbit cages.

Let me tell you now... It cost $95 dollars. Jeez! I know! Way more than I wanted to spend on cage racks, but still about $60 less than buying the kits. Worth it? I'll know tomorrow when I assemble them. I do know, however, that my cage racks will be much sturdier than the manufacturer's kits which is important to me and my large breed rabbits.
It shows in my rudimentary drawing that the legs will be 10" off the ground. I have since changed my mind into making them more like 6" so that the top cage won't be much higher than 5' tall (since I am not much taller than 5' myself).
I also wanted to share some picture updates of the rabbits. Their wool coats are really coming in now! I may wait another month to shear them because I want to wait and see how well they will shed their coat on their own.

Thistle, Ruby-eyed White buck(male)

Clementine, Chocolate Tortoiseshell doe(female)

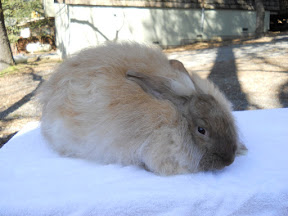
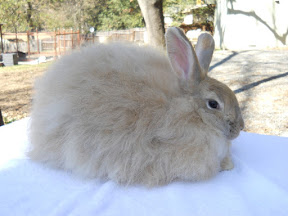
Dandelion, potentially pregnant Fawn-colored doe(female)
You can't really tell because he's all one color, but Thistle has the longest coat. Dandelion is a month older than Clementine so her coat is a little longer than Clementine's also. Dandelion is quite the model isn't she?
- Sarah
Tuesday, February 14, 2012
Seeds Officially Ordered!
Calabrese Green Sprouting Broccoli
He Shi Ko Bunching Onion
Leutschauer Paprika Pepper
Amish Paste Tomato
Cilantro, Slo-Bolt
Bloomsdale Long Standing Spinach
Early Wonder Beet
Detroit Dark Red Beet
Long Island Improved Brussels Sprouts
Mammoth Red Rock Cabbage
Danvers 126 Half Long Carrot
Parisienne Carrot
Butternut Waltham Squash
Amish Pie Pumpkin
Contender (Buff) Valentine Bush Bean
West India Burr Gherkins Cucumber
Rosa Bianca Eggplant
Quinoa grain, Brightest Brilliant
Giant Musselburgh Leek
Golden Honeymoon Melon
Australian Brown Onion
Flamingo Pink Chard
- Sarah
Monday, February 13, 2012
The Nudist Annex
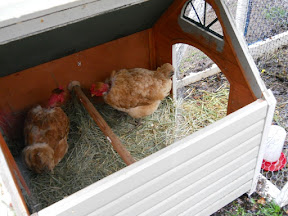
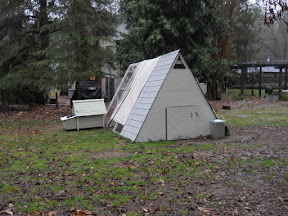
But since the arrival of our new Naked Neck Turkens we have found a new need for it. As a nudist annex. The Turkens were getting beat-up and there wasn't any sign of that stopping so we decided to create a safe haven for them.
There was no way we were about to build a whole new coop and run for just two chickens, no matter how stinkin' cute. So we dug out the old doghouse/coop...

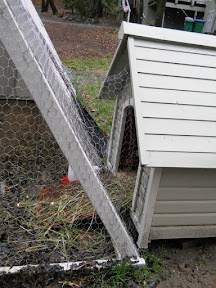
...cut a hole in the existing run, used some scrap chicken wire and secured a tunnel from the run to the front of the little coop...

...sectioned off a small piece of the run with some fencing and tent stakes...

...and inserted the Turkens, Molter and Scully. Their little coop is the perfect size for the two of them and has a cute drawbridge door that acts as a ramp into their part of the outdoor run.

I checked on them a few times today, since it has been raining, and everything is dry and warm. Success!

Real Life
Rabbits tend to be territorial which is why each rabbit needs its' own cage. Easy. Chickens are "flock" animals which means they usually like to live with other chickens. However-- as I have learned the hard way-- chickens don't always accept other chickens. If they grow-up together there is usually no problem. Easy. If you introduce new chickens to an established flock, there is usually a problem. Hard.
I found myself at the hard part.
So this afternoon, Trevor and I added an extension to our existing chicken coop. Lucky for us we still had our original "chicken coop" that we converted from a wooden insulated dog house.
We had already added a large nesting box, roost, and drawbridge door so all we really had to add was chickens. Rejected chickens. This tiny doghouse/coop is just the right size for two chickens. Just what we (and the beat up Turkens) needed! Next I will post what we did to keep the two groups separate without building another chicken run or using more space than the existing coop took up.
By the way, we decided to name the Turkens: "Scully" and "Molter". Our little joke for X-files fans the world over.
Thursday, February 9, 2012
Integration of Newbies
I've come to the realization that chickens are not the cleanest of animals. I would also never eat or boil chicken legs to get broth. You could probably guess as to why. Really, any other part of the chicken is fair game, but just the sight of the feet and I'm out. I never really felt like this before raising chickens myself. I didn't have an opinion on the edibility of chicken legs. Now I do. No.
Anyways-- believe it or not, this post is actually supposed to be about our two new chickens.
I do have a little experience with introducing and integrating new chickens into an existing flock. I can tell you now that there is no magic formula to making it work. You just have to try a few things and if it works, yay. If it doesn't, it doesn't.
I was lucky the first go-round introducing the Wyandotte and Gold-Sexlink chicks to the older Barred Rocks almost a year ago. I just let the new chicks in the Barred Rocks' run supervised a few times and then one day just left them in. Success! Its not going to be that easy to get my old flock of six to accept the new two. First off, the numbers are against the Turkens. Second, the flock of six have been together for nearly a year and it's easier for them to pick on two newbies. And third, the two Turkens have no feathers on their heads or necks which makes it more obvious they are not part of the group and makes them easier to peck at.
My idea? I put the two Turkens in my spare rabbit cage (30"x36") with a small feeder, water, and some hay then placed the cage in the coop run under the canvas shade cloth. This way the Turkens don't sit in the sun all day, they have plenty of food and water, and the other hens can see them and hear them without being able to peck at them. Last night I put them in the coop house at dusk and this morning I put them back in the cage at dawn. My only real concern is whether they will comfortably lay eggs in the open and bright cage. I may let them into the coop house for a few hours to lay this morning.
Nothing is guaranteed with new chickens. Hopefully in a few days they will be ready to integrate with the rest of the flock.
p.s. The Turkens still don't have names.