Showing posts with label Coop. Show all posts

Monday, February 13, 2012

The Nudist Annex

So, as you know, we have resurrected the original chicken coop. When our family first got chickens we bought a large doghouse with insulated walls and converted it into a "chicken coop" by adding a roost and two nest boxes on the back. After two of our four little Barred Rock chicks were brutally murdered by a neighbor's house cat we decided to up the security and build the existing "Deluxe Chicken Ark". The little doghouse/coop was retired.

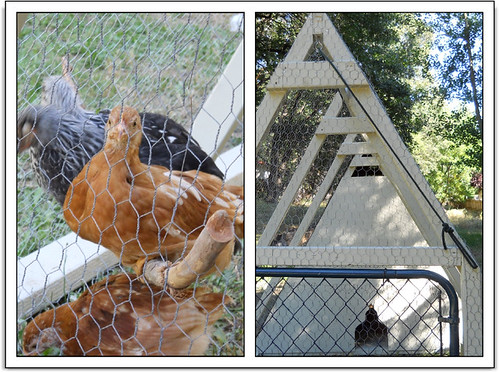
But since the arrival of our new Naked Neck Turkens we have found a new need for it. As a nudist annex. The Turkens were getting beat-up and there wasn't any sign of that stopping so we decided to create a safe haven for them.

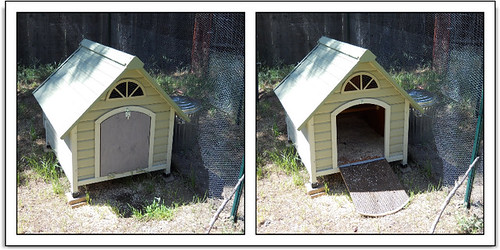
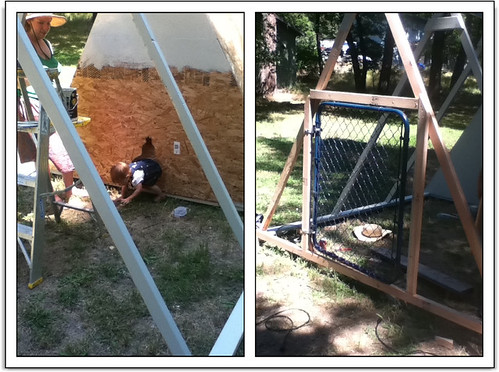
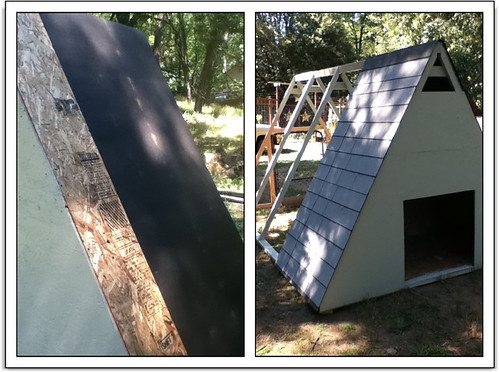
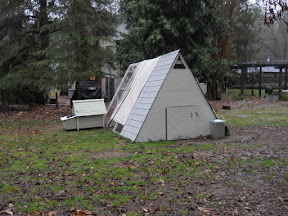
There was no way we were about to build a whole new coop and run for just two chickens, no matter how stinkin' cute. So we dug out the old doghouse/coop...


...cut a hole in the existing run, used some scrap chicken wire and secured a tunnel from the run to the front of the little coop...


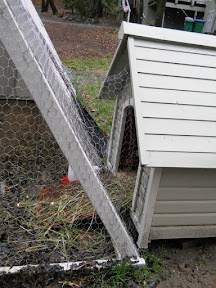
...sectioned off a small piece of the run with some fencing and tent stakes...


...and inserted the Turkens, Molter and Scully. Their little coop is the perfect size for the two of them and has a cute drawbridge door that acts as a ramp into their part of the outdoor run.


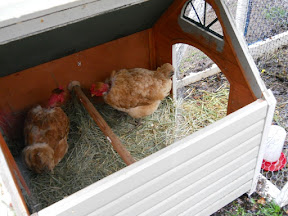
I checked on them a few times today, since it has been raining, and everything is dry and warm. Success!


Real Life

Wouldn't it be nice if a post titled "Real Life" was... well... nice? Sorry, not this time. Being a new livestock owner, I would like to think that those of the same species can get along. Rabbits should be able to get-along with other rabbits and chickens should be civil with other chickens. Ha! Boy have I learned a lot here.

Rabbits tend to be territorial which is why each rabbit needs its' own cage. Easy. Chickens are "flock" animals which means they usually like to live with other chickens. However-- as I have learned the hard way-- chickens don't always accept other chickens. If they grow-up together there is usually no problem. Easy. If you introduce new chickens to an established flock, there is usually a problem. Hard.

I found myself at the hard part.

So this afternoon, Trevor and I added an extension to our existing chicken coop. Lucky for us we still had our original "chicken coop" that we converted from a wooden insulated dog house. 
We had already added a large nesting box, roost, and drawbridge door so all we really had to add was chickens. Rejected chickens. This tiny doghouse/coop is just the right size for two chickens. Just what we (and the beat up Turkens) needed! Next I will post what we did to keep the two groups separate without building another chicken run or using more space than the existing coop took up.

By the way, we decided to name the Turkens: "Scully" and "Molter". Our little joke for X-files fans the world over.

Thursday, February 9, 2012

Integration of Newbies

I've come to the realization that chickens are not the cleanest of animals. I would also never eat or boil chicken legs to get broth. You could probably guess as to why. Really, any other part of the chicken is fair game, but just the sight of the feet and I'm out. I never really felt like this before raising chickens myself. I didn't have an opinion on the edibility of chicken legs. Now I do. No.

Anyways-- believe it or not, this post is actually supposed to be about our two new chickens.

I do have a little experience with introducing and integrating new chickens into an existing flock. I can tell you now that there is no magic formula to making it work. You just have to try a few things and if it works, yay. If it doesn't, it doesn't.

I was lucky the first go-round introducing the Wyandotte and Gold-Sexlink chicks to the older Barred Rocks almost a year ago. I just let the new chicks in the Barred Rocks' run supervised a few times and then one day just left them in. Success! Its not going to be that easy to get my old flock of six to accept the new two. First off, the numbers are against the Turkens. Second, the flock of six have been together for nearly a year and it's easier for them to pick on two newbies. And third, the two Turkens have no feathers on their heads or necks which makes it more obvious they are not part of the group and makes them easier to peck at.

My idea? I put the two Turkens in my spare rabbit cage (30"x36") with a small feeder, water, and some hay then placed the cage in the coop run under the canvas shade cloth. This way the Turkens don't sit in the sun all day, they have plenty of food and water, and the other hens can see them and hear them without being able to peck at them. Last night I put them in the coop house at dusk and this morning I put them back in the cage at dawn. My only real concern is whether they will comfortably lay eggs in the open and bright cage. I may let them into the coop house for a few hours to lay this morning.

Nothing is guaranteed with new chickens. Hopefully in a few days they will be ready to integrate with the rest of the flock.

p.s. The Turkens still don't have names.

Sunday, January 22, 2012

After the Rain

Did I tell you we finally got some rain? Friday night and through the day yesterday it rained. Not a real downpour but certainly more than a sprinkle. We also got some hail. Briefly. No snow though. I'm starting to wonder if we will get any snow this year. Then again, we often have snow in February and March.

This morning I decided it was "farm chores" time. We usually do repairs, clean the coop, clean the rabbit cages, work on the compost/garden on Saturdays, but as I said, Saturday was washed away. We actually had a good time baking and watching movies instead.

That left all the chores for today. Which is fine with me. It just gives me a little more motivation to have everything ready for the week ahead of us. So, the coop was shoveled out and the soiled bedding was replaced with hay. I usually fill their coop with dry leaves to save on costs (and honestly who wants all those pine shavings in their compost constantly?) , however after a good rain everything is as can be expected, soaked. So some of the rabbits' dry hay will have to do. Really, a whole $20 bale of hay has lasted over a month and I'm only about 1/6th of the way through it. I am a little worried that if I let it sit too long it will get too moist and go bad before the rabbits have a chance to eat it all up.

Rabbit cages are a pain in the arse to clean, let me tell you! The actual physical act of dumping the contents of dropping pan into a wheelbarrow is not difficult. Playing musical chairs with the rabbit-filled rabbit cages is. I cannot wait to get some racks built to make my life -and cleaning- a lot easier. If you saw my Rabbitry tour video then you saw my current (hopefully temporary) setup with the cages single stacked on wooden pallets with legs. I don't recommend this. But, at the end of the day, it does work and I am thankful that I even have rabbits. Especially that beautiful and dry rabbit shed! It's good to be a rabbit here at the Frühlingskabine.

Saturday, October 15, 2011

Chicken Ark Video Tour

Just a little tour of the "Deluxe Chicken Ark" we built a few months ago...

YouTube Video


- Sarah

Wednesday, October 5, 2011

Best-laid Plans

You know what they say, "the best-laid plans of mice and men often go awry." No matter how carefully a project is planned, something may still go wrong with it.

We won't be building the rabbit shed next week... it will just have to wait for funds to come together next month. Even though November is not the best time to be building anything outdoors, these things sometimes happen and we just have to learn to cope.

I also decided to alter the size of the shed from 10x10 feet to 8x8 feet. Not that we're saving much money by doing this ($50), but because it will mean less piecing of materials. All of the materials we will be using come in 4x8 foot pieces. That makes it a pain to adapt to a 10 foot shed. I will have a little less walking space, but I should be able to fit just as many rabbits, just as comfortably, inside.

In other news, I finished assembling all four wire rabbit cages which took me three days. I didn't buy the special pliers for the clips so I assembled all the cages with regular pliers... and my fingers are so sore from bending little metal clips that I'm surprised they aren't bleeding. I also (finally) installed my MacGyver-ed feeder into the chicken coop. No more toppled feeders or need to constantly rake out litter and chicken poop from the feeder tray. Thank goodness for that! Right?!

In non-animal related news, I decided to build our daughter Cami a bed for her dolls out of scrap wood. Let's just say that I failed woodshop in high school. Obviously for good reason. I'm even ashamed to post a picture of it... it's that bad. But, it will serve its purpose until our IKEA trip next month where I can purchase dolly a proper bed. Poor dolly...


- Sarah

Sunday, July 24, 2011

Deluxe Chicken Ark :: part 3

My comic
Finished run with gate.
Finished back complete with door and lock.

My comic
Inside view of the roost going from triangle front to triangle back.
Inside view of the sliding door.

My comic
Our younger chickens on their outside roosting branch.
The hen house door pulley system. Just pull the rope to open and hang it on the screw. Let the rope off the screw to close the door.

My comic
It's as easy as 1, 2, 3! When the door is open you see the red comb. When the door is closed, it reveals a friendly chicken! Ta da!


- Sarah

Monday, July 18, 2011

Deluxe Chicken Ark :: part 2

"In theory, this is going to be perfect."  --Trevor

One more trip to Lowe's this morning for MacGyver-style gate connectors, another pack of shingles, and some vent corners to turn into a self-feeder.
Supply cost subtotal: $70
Coop Cost Total: $280

My comic
All the beam sets are up!
OSB board added to the back and the egg collecting/clean-out hatch is cut.

My comic
The chicken door to the run is drawn out first...
Then cut and the OSB attached to the front. Mind you, these triangle frontp and back are two pieces: a long 4' tall bottom and a small 20"tall top seamlessly screwed on with a support between the two slanted side walls.

My comic
Always have a chicken-sized kid test out the chicken-shaped hole from the coop to the run.
Gate frame and gate intalled.

 My comic
Painted with extra Weatherbeater exterior paint we had on hand.
Shingles being added. It turned out white shingles are the cheapest and matched. Lucky us!

Stay tuned for (hopefully) the conclusion on Wednesday... 
We just need to add chicken wire, the sliding chicken door, roosts, feeder, and the back door. 


- Sarah

Sunday, July 17, 2011

Deluxe Chicken Ark :: part 1

Our chickens need a bigger and better chicken coop and after searching the Internet, I have come up with this blown up version of the one-sided chicken ark. Our budget is $300 because honestly, who wants to spend more than that on chickens? Follow along and if you have any questions feel free to ask.

The finished product should be a 8' x 4' coop with an attached 8' x 9' run for a total of 8' x 13'. It's an odd measurement because the OSB we are using comes in 4' widths and our chicken wire is in 3' widths.

Supply List (so far): 
Seventeen 2"x3"x8' pine lumber
Three 2"x4"x16' pine lumber
Six 4'x8'OSB boards
One 30 square foot package of shingles
Tar paper (had already)
Roll of chicken wire (had already)
Gate (had already)
One box of 2 1/2" Grabber screws
One box of 3" Grabber screws
Hinge for back coop door
Magnetic closure for sliding run door
Two keyed Master Locks
Staple gun with staples
Exterior Weatherbeater paint (had already)

Supply subtotal: $210


My comic
Measure twice, cut once!
Laying out the foundation.

My comic
Cutting the proper angles for the ark support beams.

My comic
Beams are put together and the first one goes up!

My comic
Both coop beams are up as well as the end beam. The two center beams have yet to go up.
The two "roof" sides of the coop are on.

My comic
The long center beam is in.
Our daughter with her trusty Phillips.

Look for more on this project tomorrow!


- Sarah